We Live a Sweet Life Filled with Wild Adventures.


Saturday, December 31, 2011

Furbabies Represent!

Last Christmas Mr. Honey bought me one of those flip-a-day calendars, 365 days of cat tips, advice and quotes. There was one recently that said this: "If you plan on having your cat play a role in your wedding, make sure you take her to the site so that she becomes familiar with the space". HA, yeah right. If you have ever travelled in a car with your cat, you know that they don't do well under stress. Needless to say, our kitties won't be with us on our wedding day. As you may or may not remember, our doggy Zeus, will be. We just bought a handsome new leash and his tie should be in any day. I first told you about all four of our furbabies a long time ago, but in light of this post, I will just say again that in addition to Zeus, our three kitties are super dooper special to us. They make us smile and laugh a thousand times a day. Since they can't be there physically I wanted to represent them in some way. Enter the adorable phenomenon that is custom cake toppers. Normally couples have themselves customized, but I skipped us and went straight for our pets.

I searched the holy grail of custom toppers, Etsy, and fell in love with too many shops. Most of them came with a high price tag to match, but I finally stumbled upon IttyBittyWoodShoppe and commissioned a topper of just animals for $40. I sent the owner pictures and placed my order. They arrived last week and I put some finishing touches on it and am ready to share!

In addition to the animals, I bought a base for $3, the pieces don't come attached as to avoid the risk of breaking in transit. The base comes in plain 'ol white, and of course I needed to add a little DIY flare to the project in the form of moss.

I picked up a bag of moss for two bucks at Wally World and went to work.


I decided to cover the whole base with moss first, and then attach the animals. No real strategy here, just add glue and stick moss. I did this over a two day period with drying times and filling in spots that seemed to just keep appearing.

After the base was all covered in moss, with as many holes filled in as possible (I swear the flash makes the white spots more obvious...) I used hot glue to attach the animals to the moss. I spent far too long positioning and re-positioning them on the base. I got to that point where I was agonizing over a hundredth of a centimeter because I was too focused on them being exactly perfect. You know that point, right? So I just went for it and the end result is just wonderful:


And I have to show you the backside, too. Zeus has a docked tail and Duke, the brown tabby is a manx. I just love that their little nubs are showcased!


I'm happy with the final product and love that all of our animals will be "with us" on our wedding day.

Now that I've shared the cuteness with you and expressed my happiness, I will tell you that it took awhile to get to this point. I placed my order in August and received them the first of December. The owner was upfront about August being busy, but I was glad I ordered them six months before I needed them. When I received the order, my heart sank; two of the four were painted the wrong color. I contacted the owner and he was super apologetic and promptly re-made the ones that were incorrect. What caused the wrong color? Monitor differences. When I look at the pictures I sent the shop owner, my pets look the correct color, but his monitor portrayed them differently. My advice to you is that if you commission any sort of custom work be specific, even if the creator doesn't request additional details. I was lucky to make my purchase from an understanding owner that ensured I was happy with his creation. That's my PSA for the day.

Our topper won't actually be used as a cake topper, moss in cake frosting isn't appealing to me. Instead, I will set them on the table with our rock guest book. Moss and rocks go together much better.

How are you representing your furbabies on your wedding day?

Wednesday, December 28, 2011

Something Old, Something New

This is a story of diamonds; the old, the new and the newer.
My "Something Old" came to me six years ago in the form of the most spectacular ring I've ever laid my eyes on. It's a piece of jewelery that I've always oogled over, and something that brings back very fond memories of two incredibly special women in my life: my great-grandma and my grandma, so affectionately called Big Nana and Little Nana.

My Little Papa, Big Nana's husband (are you following?), gave her a ring for an anniversary gift a very long time ago. We are thinking the 40's sometime. Because they were so poor when they got married in the 20's, he couldn't provide her with a diamond ring, but more than made up for that 20 years later. I remember the ring on my Big Nana's finger when I was younger, the light would hit the diamonds and easily catch any one's attention. My Big Nana passed away when I was in high school and it was naturally passed down to her daughter, my Little Nana.

Little Nana was a fan of jewelery and her husband, my Papa, spoiled her with ruby's and diamonds. Little Nana wore her mother's ring on special occasions; Christmas, Thanksgiving, weddings. I knew the holiday's and events she would put it on and always made sure to let her know I recognized that she was wearing it, and we'd mention Big Nana. My Little Nana got very sick in 2005, and while I was visiting her one day she passed me something heavy and when I un-cupped my hand, my heart skipped a beat, my eyes swelled and my jaw dropped. This is what I was suddenly in possession of:


My Little Nana just passed down an incredible family heirloom and made sure to mention that my Big Nana wanted me to have it. I tucked the ring away and made it a home in a special jewelry box and planned on sporting it for special occasions, like my Nana. She didn't like that, she requested I wear it every day and appreciate where it came from. "Think of both of us when you wear it", she said. I listened, just as a good granddaughter should, and pulled it from the jewelery box and started wearing it. It was big at first, and I felt flashy. Of course after awhile, I got used to it and my hand began to feel naked when I wouldn't wear it. My Nana passed away shortly after but I wore the ring every day on my middle finger for five years. Then I got engaged, and Mr. Honey bought me a new diamond ring, one that was just as special, but in a different way. Suddenly I had a massive amount of diamonds on my fingers, and I chose to wear Mr. Honey's on a regular basis. I never thought I would be saying this, but, it's just a lot of diamonds!

When Mr. Honey proposed he picked out a perfect ring, and I love that he picked it out all by himself. A couple weeks ago we went to order my wedding band (I'm fully aware of how close it is to our wedding, we procrastinated hugely) and I tried on a gajillion bands and didn't like a single one. If you remember my ring is set in a square setting and apparently Kay didn't make a band that was intended for the engagement ring. Crazy? I think so. There we sat, band after band, and suddenly Mr. Honey spotted a ring that he liked and casually said "Why don't you just get a whole new ring with a matching band?". The ring consultant then informed us of the "Diamond Trade Up" program where we can trade in my original engagement ring for one of a higher value. There's some math involved but I won't bore you with that. Ultimately, Mr. Honey felt that I should have a ring AND a band that I loved. I adore that man and his impulsive purchases. So, I got a whole new engagement ring and a wedding band that matched. Mr. Honey actually says he likes the new set even better than the one he picked, and I have to agree. Here's my newer "Something New" with it's accompanying wedding band:

I fully intended on using my original engagement ring as my "Something New" but now I've got something Newer that will take its place. This finally brings me to my wedding day. My Nana's (plural) ring will be with me on my wedding day, I just don't know how. My first instinct is on my bouquet, but I've got my Honey charm and the Bee's that will be on my bouquet and I don't think the ring meshes with those two things. My other thought is to wear the ring on my right hand, that way it will be more visible. But, while my engagement ring mimics an antique setting, the family ring is actually an antique setting and I don't feel like they go together.


Any other ideas on how to showcase my family ring? What is your "Something Old"?

Tuesday, December 27, 2011

The Craft Fit For A Dad

Where we will actually be standing for our ceremony is pretty bland, aside from the surrounding scenery of a frozen lake and *hopefully* snow covered landscape, so this is where my dreams of a handmade arch came into play. For our wedding arch, we wanted something natural and rustic, to compliment the outdoor winter setting. Aspen trees are plentiful in our part of Colorado, and to us, are the perfect winter tree. The white bark is beautiful all by itself, even without the foliage to compliment it.
Every year we go out into the National Forest surrounding Durango, hand pick and chop down our Christmas tree. It's a tradition I've done with my family for years and years, and now that I have Mr. Honey by my side, it makes the tradition even more special. This year, in addition to the Ponderosa Pine we would be chopping down, we added Aspen trees to list. We bought a permit for $22 which allowed us to cut 20 Aspen's down. This not only provided enough trunks to hand build our arch, but we helped thin out our forests, too. Yay for preventing forest fires!

My dad happens to be the most handy, creative man I know. He can build anything, fix anything and tends to go big when doing so. I left this project in my dad's very capable hands, after showing him a couple pictures of what I was envisioning, something like this:

Image via Elizabeth Anne Designs/Photo by Apertura Photo 
While Mr. Honey and I were scouting for our perfect tree, my dad was busy chopping down Aspen's.


We loaded the trees into the truck and then posed by the collection of Aspen trunks:


My dad spent five hours cutting the trunks, leveling them to the right height and securing them all together. Again, I left the design in his hands, and when we showed up to my parent's house for Christmas, we were blown away. My dad created an arch so amazing that we couldn't have expected anything more if we wanted to.


Zeus happily stood under the arch with me!
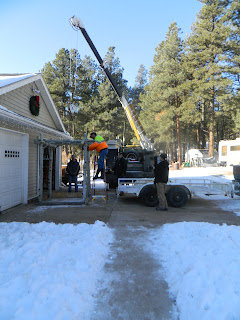
The arch is a total of 10 trees. My dad chose to go with a design that you can resembles a Chuppah, and that is because it made the arch more stable. Come wedding day, the 2x4's in the above picture will be removed, those were put in place to help stabilize the arch when we move it. This thing weighs approximately 400 pounds, not something that's easily moved. My dad works with heavy equipment and has friends with access to even heavier equipment. When you have a work of art weighing in at 400 pounds, this comes in very handy. Christmas Eve morning, my dad's friend came over with a crane. Yes, a crane...to move the arch onto a trailer so we can transport it to our venue in a few short weeks. It took my dad, Mr. Honey, my brother and Friend Troy, plus the crane to move this beaut:


I snapped the pictures but was holding my breath simultaneously, I did not want to see the arch go crashing down while being lifted by a crane, and fortunately it didn't. The guys safely moved it onto the trailer without any problems.

We are going to string the arch with soft white lights and hang a few yarn spheres to add a little whimsy to the rustic feel it currently has. To say we are smitten with the end result is an understatement, it turned out beautiful, all thanks to my wonderful dad. It was the perfect way for my dad to contribute something amazing to our wedding, since dresses and flowers aren't his cup of tea. To boot, Mr. Honey and my dad created a pedestal for our mailbox to match the arch.


The best part? We are going to be able to use the arch after the wedding, in our yard, to help serve as a daily reminder of our vows.

Is there a manly project making it's appearance in your big day? Let's give a shout out to that special guy who crafted something beautiful for your wedding!


Tuesday, December 20, 2011

Toss It

I'm pretty in the middle about the bouquet/garter toss. It's fun when the couple does decide to do it, but if they don't, I certainly don't miss it. One thing that bugs me about the toss, is trying to get people on the floor; having to yell and convince people to get up there. Singling out the singles. There are the shy and single ones that just don't want to participate and then remain in the back of the crowd (you need to make the catch!), there are the engaged folks who don't need to participate but are persuaded somehow (you aren't married yet!), and of course there's usually one or two that are actually dying to catch the bouquet or garter (just throw it directly at me!).

Here's proof, from BM Scoot's wedding a couple months ago. I was happily sitting with Mr. Honey when I got called out from across the room to join in with the toss, I declined more than once, but eventually made my way up and tried to stand in the back...then got pushed to the front of the crowd (because hey, 'you are the next to get married so might as well catch the bouquet') and was forced to compete with the one girl who really wanted and deserved the bouquet! And you see those 4 ladies behind me? They are all single too. I felt bad that the bouquet got thrown at me, when I didn't need it. I will admit, it's a pretty funny action shot:

Image from BM Scoots wedding/Photo by Newell Jones & Jones Photography
We are tossing it, the tradition that is. We aren't doing a garter toss or a bouquet toss. For one, I'm pretty damn excited about my bouquet and don't want to toss it, and don't really want to make one just to be tossed. Same goes with my garter, which I will show you sooner than later, Mr. Honey is not going to sling-shot my garter to a bunch of undeserving boys. Kidding, only about the undeserving part, kind of.

What I have decided to do is play a song dedicated to my girls for an all girls dance session. A girls only moment, whether you are single or not. This song has somehow made it's way into just about every night out, and one that gets us all jump-dancing and scream-singing. Some of the girls know about the replacement, others don't, and there has been a mention of having a little bit of choreography thrown into the dance. I'm sure you are dying to know what the song is...with an all female group and a DJ named Spinderella and other hits like "Shoop", Salt-N-Pepa's "Push It" will be replacing the tossing tradition at our wedding.

Here is the video in all it's late 80's glory:


From YouTube

Even just listening to this song now makes me want to call up the girls...there's nothing quite like dancing with your favorite girls. And did you see those dance moves? Easy enough for even me to bust out!

What is the song that can always get you and your friends in scream-sing mode?! Where do you stand on the toss tradition?

Monday, December 19, 2011

Christmas Craft Turned Wedding Solution

I thought I would take an afternoon off from wedding tasks and shift my focus from said wedding to Christmas. I needed a way to display Christmas cards our friends and family have been sending us. Well, leave it to bride brain to turn a Christmas project to a wedding project.

Heading to Pinterest for inspiration, I found the perfect solution and immediately picked up my supplies. A $5 picture frame from the thrift store:


And clothespins & jewelry wire from Wally World:


I started by removing the glass and cardboard, and also the little metal tabs that keep the glass secured:


My first idea was to spray paint the frame white, but after two coats, it was not looking pretty. The frame had too many flaws that were showing through the spray paint:


And this is where it turned into a wedding project. I spotted a bundle of white yarn and it hit me...remember how I asked for your help in how to display my yarn wrapped letters? The poll results showed "displaying them inside something pretty" as second place (I have searched for a larger last name initial with no luck) and now I had a large frame and a bundle of white yarn that needed to be used. Woop woop! I just solved two problems. I started wrapping, and wrapping, and just like my letters, it took a very long time. Mr. Honey may have made fun of me for thinking it would be a quick project. Also like the letters, I loved the outcome... there's something about yarn wrapped things that make me swoon.


For fun, I pulled my letters out of temporary storage and (pretty horribly) placed them inside the frame just to see what it would like, should this be the option I have come wedding day to display our Yarnograms.


Even in this very half-assed attempt, I think the white yarn frame will work perfectly! I will still work on making our last name initial stick out (maybe a longer ribbon?), but I also think that the guests at our wedding will know what the initials stand for...hopefully.

The letters went back into temporary storage and I continued on my path to creating a card holder. I took the jewelry wire and tied one 3 inches from the top and then measured estimated the placement of three other wire lines.

I just knotted the wire, knowing that I would be removing the wire after Christmas to re-use the frame for the wedding, so I will do a little better job next Christmas. I also wanted to have a temporary way to hang the frame for Christmas and found some plain red grosgrain ribbon in my craft room and secured it with Fabritac. A few Christmas cards and mini clothespins later, I had this:


Aside from solving my issues, I thought this DIY project could make a very cute way to display a seating chart! Your options are endless with how to paint/decoupage/cover a frame. You could also be super creative and glitter or dye the clothespins (I see red and green glitter clothespins next Christmas!) to coordinate with your wedding.

Have you had a wedding solution come to you when you are least expecting it? What do you think of my resolution for our Yarnograms, think it will work?!

Sunday, December 18, 2011

Steps to Our Sweet Suite

The final post in my Sweet Suite series, I even debated if this post was necessary but I remembered how useful I found these types of posts when I was starting to brainstorm the process of how to create our invitations.
I had an overall vision of how I wanted our invitations to look when they were put all together, including the map insert, the twine and the mini-moo. Translated to words, it was like this: invitation would be the largest element, the RSVP postcard would be the middle piece and our map/directions card would be the smallest. I had originally envisioned the map and directions on one side and a bit bigger than the RSVP but it just didn't work out that way. I printed a ton of samples until I got the sizing right, which ended up being 2 invitations per page and 4 map/directions per page. My steps will begin after the printing step, which is an obvious beginning step.
Step 1: I made new best friends with my paper trimmer and trimmed each piece (invite, map, directions) from the whole page. At an average of 6 trims for the invitations and 9 for the map and directions, it's a whole lot of trimming. My advice? Have a some beers, put on a good series, and stock up on trim blades (I went through 3).

Step 2: I mounted each piece on cardstock, using the Elmer's Tape Runner. Like my printing, I did 2 invitations per piece of cardstock, and 4 maps/directions per piece. Knowing I was going to do this, I did make the pieces a little smaller than the size I wanted so that the cardstock border would show and ultimately be the size I was going for.


Step 3: Reunited with the paper trimmer again, I trimmed the cardstock border without exact measurements, I just couldn't be that concerned about 1/8 of an inch of border, or I'd still be trimming. I tried to trim the cardstock first and then apply the printed piece, but found it to be much more time consuming and risky to get the cardstock the right size.
Step 4: Heart hole punch all the mini-moo cards.


Step 5: I measured the length of twine for one suite (which is why all the other steps are before this, I did put together a suite and then tied accordingly) and used it as a guideline to measure, approximately, all the others. Measure out 110 strands, keeping in mind if you have kitties, they will be very interested.


Step 6: Affix labels and stamps to envelopes. This will prevent you from assembling too many invites, and since it does take time you will appreciate not having to tie even one extra suite together.
Step 7: You are ready to assemble. I set up piles right in front of me so I could easily grab each piece as I put each of 110 suites together.


Step 8: Piece everything together! I mentioned it in my last post, but picking who got which mini-moo was challenging...my boss didn't need one of us smooching, and I'd think his friends would like the skateboard photo best (but I ran out of those early), and then the shadow picture just wasn't very effective at all. Choose your moo's wisely! Stuff in envelope.
Step 9: Seal envelope. This was the worst part of the whole process. For one I hate licking envelopes (who doesn't?!), I tried using a wet sponge but it soaked the whole flap. When I accepted that I had to in fact lick every.single.one, I realized the stickiness wasn't immediate. I then went in groups of six, sticking stacks of three under something very heavy to help make the flap stick. I was *this close* to venting to my envelope provider.
Step 10: Display in boxes and CHECK INVITES OFF THE LIST!!!


From start to finish, I'd estimate the above 10 steps took around 10 hours, over the course of a week. It sounds like a lot but it wasn't too bad once I put on a good show and made myself comfortable on the couch.

Now that I've told you everything about our invitations, it's time to move on and share some other wedding crafts and details...we are down to the last month and I've got lots to share!

If you've recently finished your DIY invites, how did your steps/time spent compare?!

Wednesday, December 14, 2011

Sweet Price Tag

It was never a question for me whether or not I would design our invitations. My job is very logical and so any creative outlet I can utilize, I do. Client presentations have become very colorful, just to appease my creative urges. Our budget also had something to do with it, as much as I would kill for a custom illustrated suite, it wasn't in the cards for us. I started brainstorming in the first week we were engaged and over the course of the year I slowly created our invitation suite. Having time on my side was a huge advantage; I was able to take my time and when I would reach a point of frustration I could walk away and (hopefully) come back more inspired. So, just how much did our DIY suite come out costing?
A Sweet Price Tag:
Printing: $86.75 at Office Depot.
Gray Card stock: $14.25 from Cards and Pockets, 3 packs for $4.75
Cobalt Envelopes: $25.20 from Cards and Pockets, 120 for 21 cents. $15.46 for shipping.
Oyster Gray Twine: $10 from Whisker Graphics. $3 for shipping.
RSVP Postcards: $14.97 from Vistaprint. $6.50 for shipping. 
Mini Moo Cards: Free from Moo.com. $5 for shipping.
Labels: $16.17 for Oval and $16.17 for round from Office Depot.
Postage: $77.40.
Total: $260.91
Shipping for all products was $29.96 bringing that to $290.87.
We sent out 110 invitations, bringing the cost per invite to $2.37 or $2.64 when I include shipping in the total cost.

The wild card with DIY invites (or anything DIY, for that matter) is your time spent on the task. Frankly, I have no idea how many hours I spent on our invitations, or how much an average invitation creator charges. No clue. However, I was especially curious how my $2.60 invites compared to something (I also wanted to prove to the mister that we did in fact save money!). I fully realize this is comparing apples to oranges, and is by no means an official research, it just provided me with a comparison.

A quick search on Wedding Paper Diva's returned an approximate price of $442 for 110 invitations, RSVP's and an insert (no envelope, postage, twine or mini moo). I often visited Whimsical Prints on Etsy, and fell in love with multiple designs in her shop. I estimated a suite of 110 (not including postage or the extras) would have been around $375. Based on this very loose research, I'd say I saved a pretty penny. Happy, Mr. Honey?!

Some Sweet Tips!
Printing: I chose to stick with a local printer, well a national chain, but a local location. I compared Office Depot to The UPS Store, and while the prices were just about the same, the quality was not. Office Depot's printing was far superior. I went in to both stores before committing and had them print off one of everything for me to see how my colors translated through their printer. Office Depot printed my order for me while I waited, a whole 15 minutes!

Twine: I used the (k)Not twine from Whisker Graphics, it's discounted because there may be a smudge somewhere on the twine or it has an inconsistent wrap. I didn't care, have yet to notice any sort of a flaw, and it saved me $5. (k)Not is only available when a batch goes awry, so I checked every other day until my color was in.

Postcards: Sign up for Vistaprint. Now. They run the best deals. I got 100 postcards for free but paid for 2 of my own uploads, and then for a color backside. Still, my RSVP's were only fifteen cents a piece. If you go this route, may I suggest having your return address on the front/glossy side. I had the guests write their responses on the glossy side, and while it's not really an issue, I can tell some people had to switch pens once or twice.

Mini Moo's: I scored big time on these (thanks Mrs. Hippo!), I came across a deal and got my mini's for free, I just had to pay the $5 shipping. I had my cards all set and in my cart for a couple weeks and was planning on spending the $20, so the deal didn't persuade me to order, it was just icing on the cake. I used 12 different pictures, but wish I would have kept it to 8. I had one that was too mushy and one that wasn't mushy enough. Seriously, picking which mini moo went to which guest was challenging!

Labels: I had originally planned on using the labels that Mrs. Pony used on hers, but I couldn't get them formatted on my dang printer...so I happened to be in Office Depot and picked up the round and oval labels from Avery. I downloaded the template, inserted a border and then had to also insert a text box to be able to have text inside the border. Headache. This forced me to just do one page of labels, and then replace the current text with the next guest addresses (type 18 addresses, print, next 18 addresses, print, etc). In the grand scheme of things it wasn't that time consuming, and I loved the peach dots so I was fine with it. What I wasn't fine with was the fact that these labels smudge. They smudge horribly. Even though it says they are compatible with ink jet and laser printers, and after letting the labels dry for multiple hours. I can guarantee every single envelope was delivered with a smudged label, boo.

That's a lot of words and no pictures for one post...but I hope if you are planning/hoping/in the middle of creating your invites, you found something helpful. The price helped, but I found creating our suite so rewarding, I would do it all over again!

How did the cost of your DIY invites breakdown? Any helpful hints for other DIYers out there?

Saturday, December 10, 2011

A Sweet Suite

Hi Hive! Whew, am I glad this last week is over, it was a busy one; from jury duty to decorating our Christmas tree...clearly life doesn't stop when you are planning a wedding and anxiously trying to write a post to reveal your invites to an important online community! We have had RSVP's rolling in since last week and I think it's safe to say that our invitations have reached our guests and I can finally share them with you!
Having designed, created and assembled every part of these, they were certainly a labor of love but I'm also relieved to have them completed. You remember my mailbox reaction? That has dissipated and has been replaced with giddiness each time I check our mailbox and see it filled with RSVP's. Without further ado, the Honey Invitations! Starting with the envelope, that I'm oddly in love with:

Guest Address Label
Honey Return Address Label
I chose the A7 Cobalt Blue envelopes from Cards and Pockets. For the guest address label I used an oval and for our return address I used a round label. Our invites only required one .44 stamp, and the Garden of Love stamps were just perfect.

After opening the flap, carefully of course, they saw this sneak peek:

And after pulling out the little bundle, they held this in their hands:

 Twine, mini-moo's and pretty paper in all it's invite glory! Let's start with the top card, "Our Wedding Map".


I fell in love with this idea a long time ago, and while a map is not completely necessary for our wedding since we are having the ceremony and reception at one place, even some local guests aren't too familiar with the Vallecito Lake area (in addition to our out of town guests). I turned to Mrs. Ballet Flat's tutorial on how to make your own map and followed it step by step, check it out here. I mounted the map on one side of the card stock and the directions on the other, this was both cost and time effective.

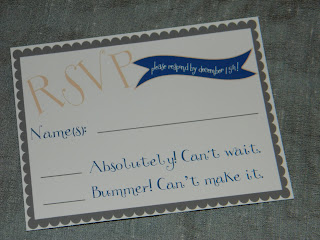
The RSVP postcard was tucked just behind the map insert:


The postcard came from Vistaprint. We choose to forgo the more formal "M" option and instead used the straightforward prompt of "Name(s)". I used Absolutely & Bummer for our "yes" or "no" options, two words I use daily.

And the actual invitation!

I incorporated the chevron stripes and the banner from our Save the Date. I was so smitten with banners, I was determined to use them. The two fonts on the invites are courtesy of Kevin and Amanda and are Three Dates, One Night from Scrapbook Fonts and Pea NJH Whimsy from Fonts for Peas. The labels used Digs My Hart from the Scrapbook page. The wedding insert and the invitation were both mounted on dark gray matte card stock from Cards and Pockets.
I used twine from Whisker Graphics to literally tie the inserts together and used the Mini Moo cards to showcase our engagement pictures, which on the back, directed guests to our wedding website for additional details.


Here's the entire Honey Suite:


We took as much formality out of these as we could, hoping to set the tone for our laid back, whimsical affair. We wanted the invitations to be fun and unique, and the response so far has been just that. Our guests have appreciated the different approach to a wedding invitation. Sure Miss Mole and I happen to have pretty similar tastes (or inspiration pictures, thanks to the 'Bee!), but luckily for all of us, the majority of guests are seeing twine tied invites for the first time and don't recognize it as a trend.

So, there it is, our sweet invitation suite! I hope you enjoyed them, it's a relief to have them done and be sharing them with the Hive. Up next I will weigh in on the cost of our DIY invites.

What elements are you incorporating in your invitations that may be considered a trend in the wedding blog world? I for one, still think that twine is brilliant, trend or not :)