We Live a Sweet Life Filled with Wild Adventures.


Wednesday, June 29, 2011

My Beloved Yarn Spheres

With so many DIY projects looming, my mom and I decided to kick of wedding crafting with the project I have been in loooove with since I first started this wedding planning journey.

The Yarn Spheres!
{Image via Pinterest, from Crafted-Love}

I've mentioned my love affair with these beauts once or twice and even though I don't know how many and in exactly what ways they will be used, I do know they will be hung in their full glory somehow, someway.

I used two tutorials I found online, here and here. We used the first time as a trial run to see just how difficult the task was. The first one is titled: Messiest, Merriest & Whirliest, and titled very appropriately. You get super messy doing this, don't say I didn't warn you!
I gathered my supplies:
Vaseline, Cornstarch, Elmer's Glue and Water
Only one tutorial calls for cornstarch, so we decided to try it with the first time
Yarn. One specifically says cotton yarn while the other didn't specify. The white is cotton while the others are acrylic
Balloons. We used 7 inch, 9 inch and 12 inch
When we blew up the balloons, we tried to keep them more in a rounded shape than a pure balloon shape. We used the measurements from one of the tutorials but ultimately found we added water here, cornstarch there, just to get the right consistency...like drippy paint. While my Mama Honey mixed the concoction, I suspended the balloons with yarn (from an exposed door frame, but you could use clothesline or a shower/curtain rod) and lathered them in the Vaseline (to allow less glue to stick to the balloon when you are ready to pop it).

Suspended and lathered up

This is where it gets more complicated. I don't have pictures of us doing this part because we were, well, covered in glue and cornstarch. Mama Honey would soak the yarn in the glue mixture while I strategically wrapped the yarn around the balloon. For the first balloon we tried cutting off an approximate amount of yarn and just soaking that all at once, but we ran out of yarn a couple of times. Fail. So then we just kept pulling it (from the middle!) until we felt we had accomplished the right amount. When you get to that point you just tuck the end behind some of the layers and count on the mix to keep it from unraveling. 

After balloon one and two, we were pretty frustrated. And messy. We switched up the container we were using to a flatter pie pan (we were using a deep Tupperware) and doubled the recipe of the mixture. By the fourth balloon we were getting the hang of it. 

Spheres in process...the orange on the right was about the forth one we made and the far left pink was more like the seventh, slowly getting the hang of it

We made nine balloons and it took us about three hours, start to finish. They were getting knocked out much much quicker towards the end. I let them set a full 24 hours, actually a little longer for good measure and then took them outside and popped the balloon.

The finished sphere after popping the balloon! Sorry for the crappy shot, I need a new camera

So...what did we learn? I mentioned the first time was a trial run and even though I am just as much in love with our final product as I am with the pictures, I have some pointers if you are going to try this crafty project.
  • Use a large, semi deep baking sheet for the mixture. This will make soaking the yarn much easier
  • Wrap the yarn tight! It is no fun to go back and fix a loose piece. I discovered turning the balloon helps keep the yarn tight rather than just using the yarn
  • I found it easier to wrap vertically once and then start going diagonal to get that first piece underneath so it wouldn't come loose
  • Less is more. In the finished product picture above, you can see the sphere in the forefront is to thickly coated with glue AND there is too much yarn. I think the airier they are the more whimsical they look
  • Regarding the kind of yarn, I didn't find the difference drastic enough to go and buy all cotton yarn. But I think the white turned out the best, maybe because it's white or because it was cotton
  • Make sure to not wrap too much or to close to the knot of the balloon so that when you pop it, it comes out easier.
  • Blow up your balloons the night before! We had two balloons that must have had a tiny hole because they began loosing air shortly after we completed them (you can see in the picture above, when they are wrapped and suspended the red balloon looks a little sad) and after 24 hours the balloon had shriveled to nothing which didn't give the yarn anything to harden to and this was the result of those:
Sad Spheres
We got seven spheres made, learned a few tricks and were ready to knock out an additional thirty. Stay tuned for the next attempt!

How did your first big wedding craft project go? Did your final product live up to expectations?

Thursday, June 23, 2011

Our Urban Side

I whined about not being able to afford the photographer of my dreams in my last post, because of (the lack of) money and my best friendor situation. Well sometimes a girl gets lucky enough to have the best of both worlds: a bridesmaid AND a talented photographer.

We are fortunate to have gotten our engagement pictures taken by the amazing BM Candace, as our wedding gift. Since we aren't paying, we gave her full reigns, with a couple requests and suggestions. I think for her it was fun because she got to be uber creative, and for me, well it was my best friend shooting us, need I say more?! I knew we were in for something amazing, because in the days leading up to our first shoot she was sending me Pinterest pictures as inspiration. BM Candace decided that we would do two shoot; an urban influenced shoot and a Colorado inspired shoot.

It was exciting and nerve racking all the same. I've been in a gajillion pictures with BM Candace but never on the other side of her lens. Fortunately I mixed up a batch of Sweet Tea Vodka and Lemonade to help ease my nerves.
Sweet Tea Vodka


Our first stop was the local Skate Park


Of course Mr. Honey couldn't resist playing a little bit during the shoot!


Then we played in the park and on Mr. Honey's skateboard


We headed to our downtown area just before dusk and the light was incredible! We climbed some stairs and hung out on top of a roof, even though it clearly stated No Trespassing. We are rebels like that.


 The light at dusk and us standing on the roof made for these super unique and fun shots, a la Peter Pan!


The final stop was a bar. Yup, we had some engagement pictures taken in a bar. We were going for classy in a less than classy place, that's urban right?


We had SO much fun and Mr. Honey and I are so happy with them. They reflect US and show our personality through and through. They aren't expected and that's what we love about them. 

Our next shoot was inspired by this picture:

Tell me about your 'off the beaten path' engagement locations, Bees! I want to hear about other fun engagement session locations!

*All pictures by Candace Cross Photography unless otherwise noted

Wednesday, June 22, 2011

A Best Friendor Dilemma

Usually, the first vendor booked by an engaged couple is the photographer. It's a smart move, insuring the person who will document the biggest moments of your big day is set in stone. Well the Honey's haven't booked a photographer. That's because our preferred photographer is a Friendor (a friend and vendor all rolled into one), but not just any friend and not just any 'ol vendor; she is one of my best friends and also a bridesmaid in our wedding. Hive, meet one of my eight bridesmaids, BM Candace of Candace Cross Photography.
Initially, people are envious our friendor relationship and automatically assume that we get to have her shoot our wedding, I mean she has some serious talent. While I wouldn't trade anything in the world for having her stand next to me at the altar, I will admit I'm jealous of the couples who get to have her document their big day:


I'm spoiled when it comes to wedding photography, because I get to see the amazing work BM Candace does and because I've saturated my mind with photography from wedding blogs. Clearly I want to have my cake and eat it too but the cold, hard truth is that we can't afford the photographers that I want and I'm terrified of paying for a photographer we can afford and receiving sub par photos. I know that sounds ridiculously snobby. Currently, we are trying to figure out how get the drool-worthy photos that I crave at the price our wallet can afford. It's not a fun spot to be because time is ticking. We do have some promising leads as other options for photographers, so I'm not panicking yet.

The silver lining to our dilemma is that BM Candace, of course, does engagement pictures and does a damn good job with them. Stay tuned for our engagement pictures and to see how our photography dilemma pans out!

So hive, who else is using Friendor's for their wedding? Who else feels their expectations far exceed the budget?! I can't be the only one!

*All photos in this post by Candace Cross Photography

Tuesday, June 21, 2011

Chevron, Banners and Dots, Oh My!

A little while back I posted about some Save the Date inspiration. I'm finding more and more that writing my thoughts out and putting inspiration pictures all together really helps me make my mind up...because just a few short days after that post, I finally finally made a decision and ordered my Save the Dates.

I kept coming back to the two below. I couldn't get over how adorable the banner was in this first one and the gray chevron stripes in the second one make my heart pitter patter.
Image via Oh So Beautiful Paper

Image via Minted

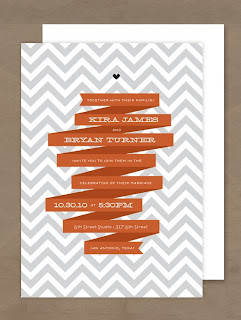
I was really struggling with finding a background for all of my previous designs and kept skipping over the chevron graphic because I thought it was too modern for the feel we were going for, but then I remembered this from my invitation searching, a banner and chevron together:
Image from Etsy seller Cheerupcherup
I loved the combination of the chevron and the banner, but I wanted the banner to be more free flowing. The invitation below has been in my invite inspiration folder forr-evah, I am so in love with this invitation, there was no way I wasn't going to use it as my inspiration foundation.

Image via Invitation Crush by Oh My Deer!

I had accomplished the background for a graphic element and the banner for a whimsical touch. Onto the wording, I had used the Wedding Chick's templates very early on in our engagement and remembered loving the wording on one of the templates, so I stole graciously copied it. I now had my fun statement that I wanted to incorporate.
I knocked out the design in an afternoon and was ready to order. (The trickiest part was creating the perfect banner. Remember, I'm using our good friend Microsoft Word, and yes they have an insert, shape, banner option but it was too structured; I was dreaming of the free flowing, softer edges of the banners like the invitation above. After hours of playing around, I found the 'edit points' in the drawing tools and started manipulating the standard banner into my own and wa-la...no longer ridgid.)

I had read tremendous reviews about Vistaprint and signed up a few months ago, well the first part of June I received an email for 100 FREE postcards plus free uploading of images. This helped put a fire under my ass, since I only had 1 week to get my order in. I opted for the color front, gray scale back and then paid $8.99 for matte recycled paper rather than the free gloss version. That put my total order, plus shipping & processing to $17.47...or seventeen cents per Save The Date. I ordered the slow option, 21 days, but much to my surprise they arrived 14 days later!
Here they are, our Save the Dates:

The front and back
Close up of front: gray chevron background with navy, peach and gray font

Close up of the back: all in gray. Banners and chevron!

I'm very happy with the way they turned out. The wording is fun and laid back. The chevron stripes add some structure to the whimsical banners and the dotted borders. The font (which is Milk and Cereal, Digs My Heart, and Never Writes Back from KevinandAmanda) has the perfect balance of handwriting and whimsy. I'm relieved to have these done and feel like I now have the ideal bouncing board to begin work on my invitations. These babies are addressed and being sent out into the world as you read this!

Hive, tell me about your Save the Dates!

Friday, June 17, 2011

Just Hangin' Pretty Lil Things

I am struggling over here in wedding planning/deciding land...you'd think I would be struggling with something significant like money or the guest list or what food to serve, but no, I'm struggling with what pretty detailed thing I want to decorate with. That's right I can't decide what I want to hang in our reception space. If you recall, our venue is very blank, so hanging something pretty is a must.

Fabric Bunting:
Image via Pinterest/Photo by Matt Davis Photography

Image via Love and Lavendar/Photo by Lizelle Lotter Photography
I'm very drawn to the bunting; whats not to love about the adorableness of fabric bunting. I fear it might be a little too modern or too country, depending on the fabric chosen, to meet our rustic whimsy feel. Maybe my bridal shower would be the perfect excuse to make some of those little flags!

Pom Pom Garland:
Image via HonestlyWTF

Image via Martha Stewart
When I saw Pom Pom garland I was sold, then I found the Yarn Pom Pom garland and thought it would be a fun substitute to my yarn spheres I'm already doing for the ceremony...both are made out of yarn and could coordinate that way. I'm just a little scared the Yarn Pom Pom could come off too playful instead of the right whimsical touch.

Snowflakes:
{Snowflake's via Intimate Weddings}

I think an obvious choice to a lot of people would be snowflakes since we are doing a winter wedding. I think they would be pretty, especially if we had a ton of them made out of some shimmery paper. But I'm actually trying to avoid the winter theme in all other aspects of the wedding.
Paper Lanterns:

Image via Style Me Pretty/Photo by Simply Bloom Photography 


Paper Lantern's via Studio Bash

Ohh paper lanterns, in huge quantities these pretty things make the perfect statement. However two of the wedding's I've attended lately have used paper lanterns so I'm thinking this might be too expected.

Ribbons:

Image via Green Wedding Shoes/Photo by Natalie Shelton

Image via Southern Weddings/Photo by Nate Henderson
The ribbon concept is new to me and I'm swooning over the images. I love the unfinished edges and the multiple patterns. Added bonus,it's so simple; cut and tie and done!
 
Yarn Spheres:
The other possibility is the yarn spheres, which I have already decided we will be decorating our ceremony arch with:

Image via Ruche
I can't explain why I love these spheres so much but I do. I think of all the ideas, this encompasses my vision the most and ties in so perfectly. The sphere shape hanging so delicately screams whispers whimsical while the natural yarn material hands itself to the rustic vibe.
How's a bride to choose from all the pretty options?! Tell me hive, what pretty little thing will you be hanging at your wedding?

Thursday, June 16, 2011

Wedding Pro's

This past weekend started the Wedding Extravaganza of 2011 (yes I realize I also have a Crafting Summer of 2011, it's gonna be busy folks). We will be attending a total of four weddings from June through September...then a couple months off and it's our turn. This is in addition to my cousin's wedding this past February and the three we attended last summer. Tired, yet? I'm sure poor D is, especially because these are all my peeps. My calendar is filled with hearts marking weddings and circled important wedding dates, I'm a doodler what can I say:

{Personal picture of my Wedding Events Calendar}

Since January, I have attended three bachelorette parties (with three left to go) and two bridal showers (with three left to go). I figure that with each wedding you typically have a minimum of three events to attend, sometimes four if you are invited to the rehearsal dinner. Adding that all up, that means we have around 15 wedding related activities to attend. Yowza.

When we arrived at the reception this past weekend, I died and went to bridal planning heaven (is that an oxy-moron?!). Sure, I noticed extra details that a lot of guests probably didn't just because I have bridal brain right now, but wow. I'm positive that even the most out-of-the-wedding loop, first-wedding-ever-attendee, I-despise-weddings guest was beyond impressed. D turned to me and said "We should take notes." My brain had already taken it all in glancing from the silver Chiavari chairs to the stacked vintage tea cups to the glass chandeliers to the cabana's posted up outside of the main tent. I didn't need notes to know this was one for the books. I can already imagine opening my Ruffled daily email to see her wedding featured.

{Personal Pictures of Cabana's}

It hit me that when D suggested taking notes, that by the time we have our wedding we will have gone to eight weddings together...and each wedding, in all of their original glory, is inspiring and gets my bridal juices flowing. The wedding this weekend, beyond the amazingness mentioned above, supplied guests with white boa's to dance with. Feathers were flying through the air and covering the ground. It was so unique, check it out:

{Personal Picture of the Bride dancing with BM Candace}
While claiming to be pro's might be a bit of an exaggeration, I think we will take in a lot from the four weddings we go to this summer. And the best part? After celebrating with each of those four couples on their special day, they will get to celebrate with us on ours. *Cue the aww's*

Wednesday, June 8, 2011

River Trippin on the Dolores River

In justification of my blog title, So Sweet. So Wild, I figured it was time for poof of that title. I started this blog to document our wedding and get my thoughts on to some sort of a medium, but I have high hopes for my (eventually, our) blog after the big day to document big(ger) adventures.

A lot of the time our life is both sweet and wild, as in the case of this adventure, the Dolores River trip. The Dolores River is a tributary of the Colorado river, normally the river is very low and used mainly for irrigation purposes. The river is dammed by McPhee Reservoir, and a 'fill then spill' policy is used to increase the CFS on the river, only if we have had an excessive rain and snow season. As was the case this year.


We had a group of 9, with 3 rafts and D paddling a canoe. The river was flowing at about 1,000 CFS (cubic feet/second) with much of the stretch we did, 47 miles, being class II rapids. Easy peasy. One rapid, named Snaggletooth, is a class IV or V depending on water lever. We ran it probably at class IV.

Friends on the Rafts

D in his Canoe

D Rowing

Me & D on the Windy River

 Solar Stereo!

 Perfect Day on the Water

The Ladies of the Trip

 Scouting for a Campsite

River trip Outfits are Stylin'

 Campfire on the River

Campfire Games, Bop It

Lots of whiskey and beer was consumed along with a delish dinner of taco salad. River trips are amazing, all day on the water and camping right next to the river...it's like car camping but better. I've mentioned before that D is in his element while on the river...whether it's a kayak, a canoe and someday a raft. To bring this story full circle -ahem- to wedding planning, we will be registering for a raft for our wedding. We will be creating tons of sweet memories on the rivers post wedding.

There ya go, a wild adventure documented from our sweet life.